Custom Robots Header Tags Settings For Blogger (Blogspot Blog)
How do I make the correct settings on Robots Header Tags? What is the effect or impact on the website if you make incorrect/wrong changes. A custom robots header tag is a robots command to search engines to perform checking, crawling and indexing our site. So if you make a mistake in giving the command code on the Tags, it will certainly have a bad impact on the blog.
The commands sent to this crawler robot are intended to inform what can and cannot be indexed. Of course this is something that must be done correctly so that our website can be crawled and indexed according to the Robot Tags command that we set. And this will be very influential for blog SEO.
What is the Robots Header Tags Setting
This Robots Header Tags is to change the default value of blogger about how indexing and crawling is done by the blogger system automatically and then changed to manual by setting the command code on the Robots Header Tags.
There are 3 sections set in this Robots Header Tags, namely:
- Home page tags
- Archive and search page tags
- Post and page tags
All three are the main sections or frameworks of the blog and it is supposed to be set up correctly so that the three sections can be maximized properly on search engines.
Tags and the purpose of robots header tags
The following are some of the tag terms found in the custom robots header column or custom robots header tags that you may need to know in advance to understand their use for search engine optimization.
all
If you set this tag, the crawler is not bound by any constraints. They can freely search, index and expose content on your blog.
noindex
Not all blogs are for public notice. Even if you don't share your personal blog URL with anyone, chances are people will find it from search results. In such a scenario, you can use a noindex tag because it prevents search engines from indexing the page.
nofollow
nofollow and dofollow tags are for outbound links. Dofollow is the default robots tag for all your outbound links. That means search engines can sneak into the pages you link to. If you don't want bots to search through your links, adding a nofollow tag should help you.
none
Nothing combine the noindex and nofollow tag features. The crawler will not index your page or read the link if this value is checked.
noarchive
You may have noticed the cached labels with most website links in the SERPs. This indicates that Google has taken a copy of your site to their servers to display if your web is clicked again. The noarchive tag turns off the cached version of the search page, so the data stays fresh.
nosnippet
Snippets of text in search results help people find what's on a web page. If you want your content to remain exclusive, you can enable this header tag.
noodp
The Open Directory Project or Dmoz is a directory of man-made websites. Google sometimes uses information from there. You can turn it off with this tag if you wish.
notranslate
Do you want to disable translation on your site? Then use notranslate for the right purpose.
noimageindex
If you allow Google to index your images, people can steal them and use them on their own websites. To prevent this, you can keep the image still deindexed using the noimageindex tag.
available_after
On Blogger, you'll find the appropriate fields for this tag. So, web pages will be indexed after this time.
After everything has been explained clearly about the meaning of the value of tags found in the custom robots header. It's time we get to the main topic of this post, which is setting Custom Robots Header Tags.
Custom Robots Header Tags Settings For Blogger
As you know, we're talking about blogger-specific robot header tag settings. Follow the steps provided below for a good robots header setup to be optimal for search engines.
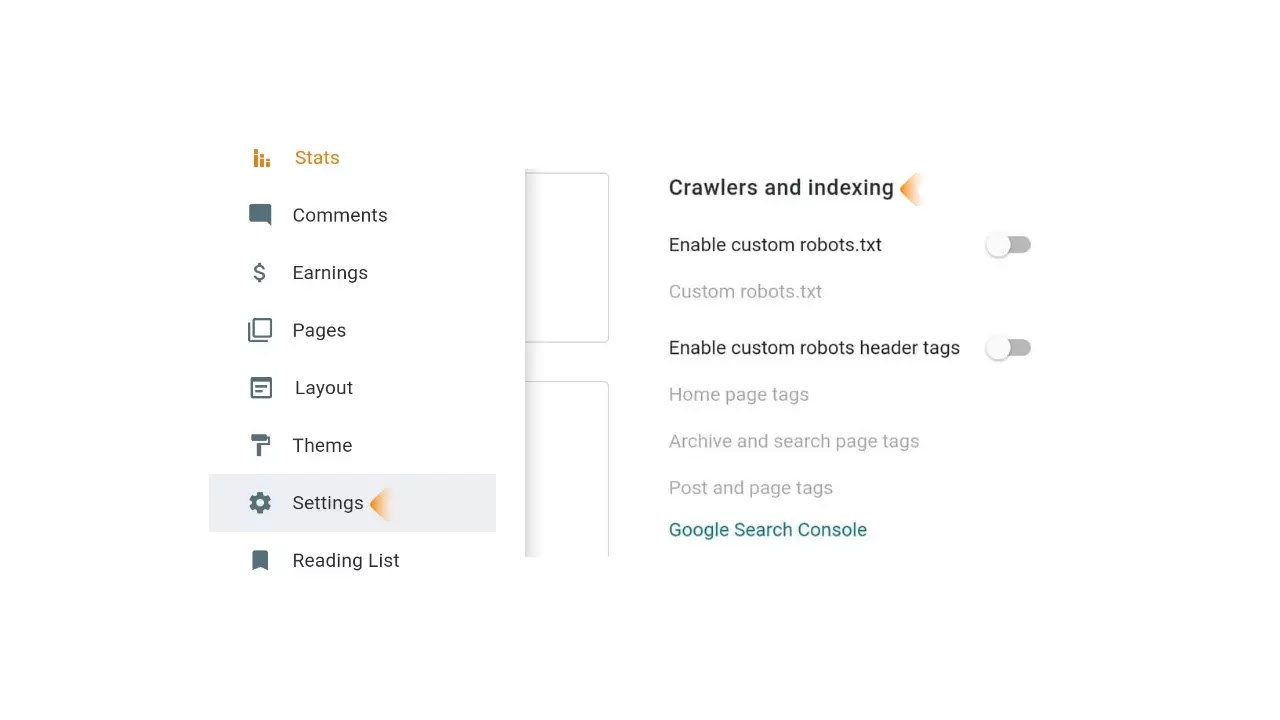
- Sign in to Blogger and select the blog for which you want to set header tags (if you have more than one blog)
- Then click on Settings and go to Enable Custom Robot Header Tag which will be found under "Crawler and Indexing"
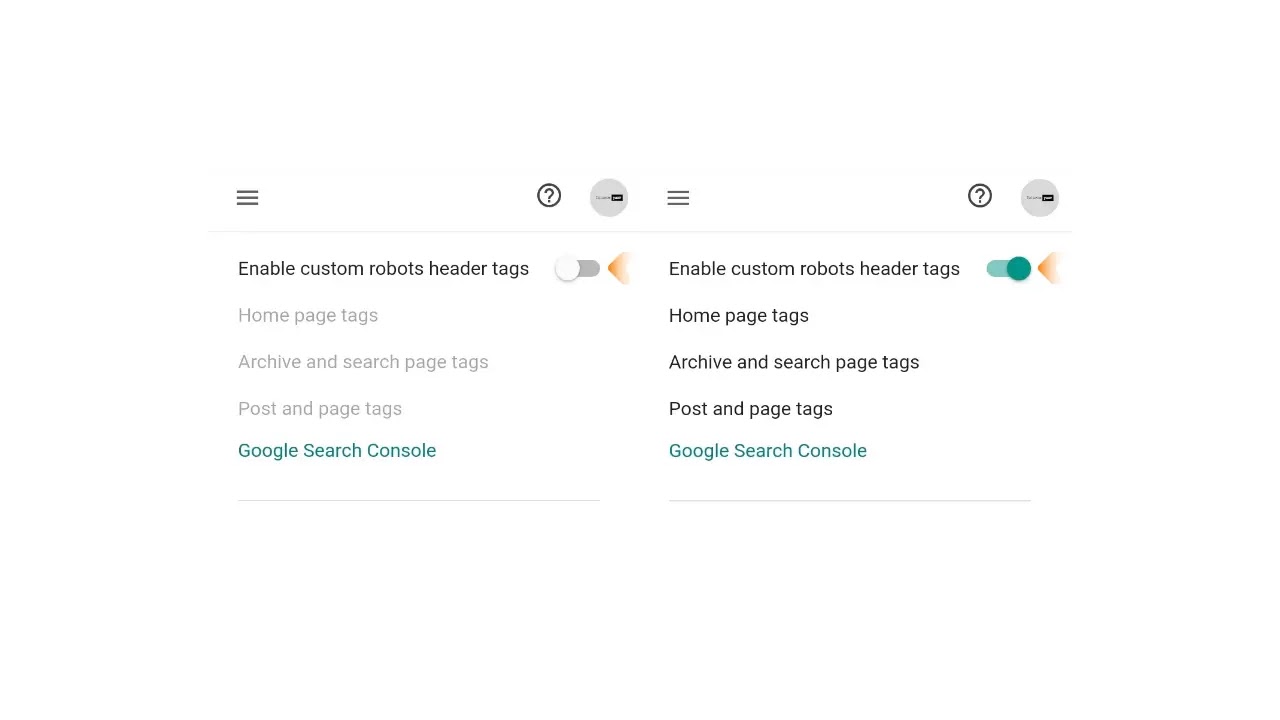
- In this step, you will see the disable button next to the custom robots header tags. Click on that button to enable it
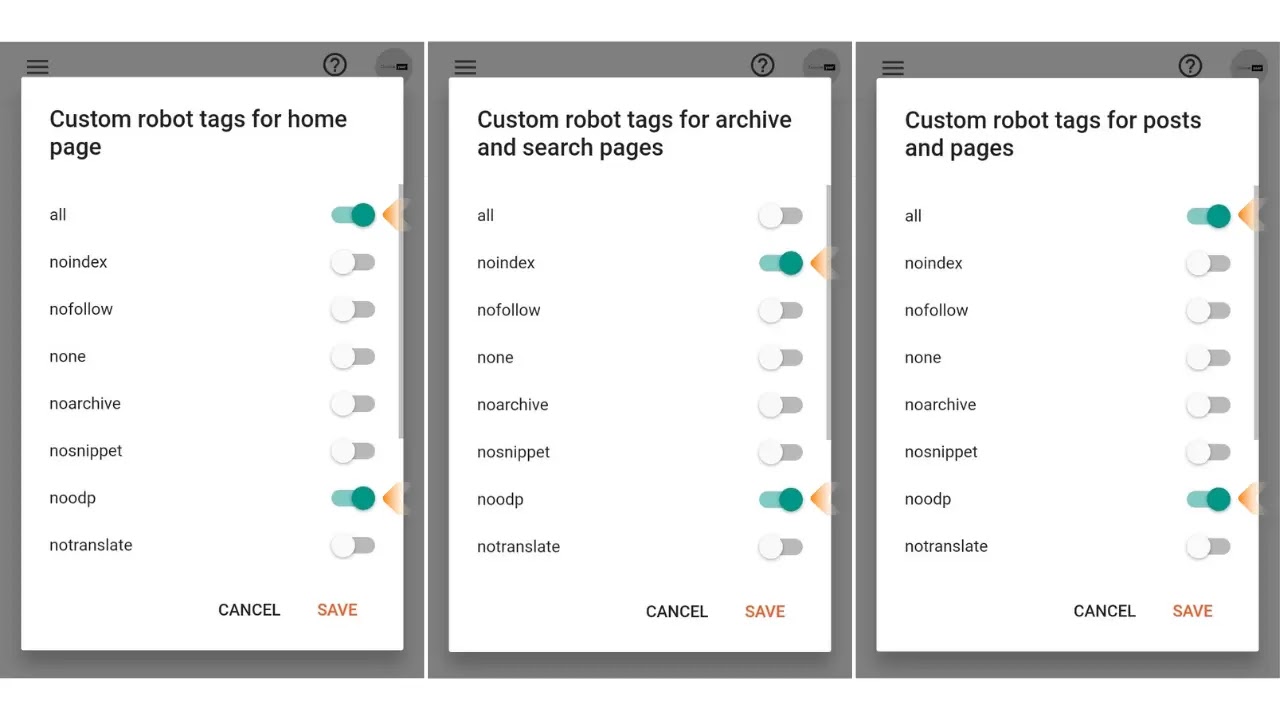
- Now you have to click on Home page tag, Archive and search page tag, Post and page tag one by one and enable the tags I chose and select the save button. Don't think too much. It may sound complicated, but it is not. You can set it yourself by reading "Tag and Destination Robot Header Tag" again. Or, just follow the same settings I chose (see image below)
On the post page, these settings can still be changed. But you should be careful when using it. And it's better to just follow the default.
Congratulations, you have now successfully set up your Custom Robots Header Tags.
Customizing robots header tags aims to increase a site's visibility to search engines about what it can and cannot crawl.
And it is important to know that never check the noindex area in the post section. Because it will make all your posts will not be crawled and it will make you lose a lot of time to reset the search console to make improvements.
So this tutorial about Custom Robots Header Tags Settings For Blogger (Blogspot Blog) which is also one of the SEO On Page optimization tricks. Hopefully useful. If anything is not clear, do not hesitate to ask in the comment box below or on the contact page. Thank you.

Komentar
Posting Komentar